Posterior crown preparation
On Preparation
Conventional crown preparation

This post demonstrates the protocol for making ceramic crowns on posterior teeth.
Look at the scheme, the general characteristics of a ceramic crown preparation :
- deep chamfer finish line ( or a rounded shoulder ), flat and smooth with about 1.5 mm thickness.
- 90 degrees Cavo-surface angle with the external surface.
- rounded internal angles.
- approximately 8-10 degrees taper between the axial walls.
- approximately 2 mm of available space for ceramics, especially in the cusps area, 1.5 mm is the minimum.
- occlusal wall with convexities and concavities, following the external anatomy of the crown to ensure uniform thickness of ceramics.
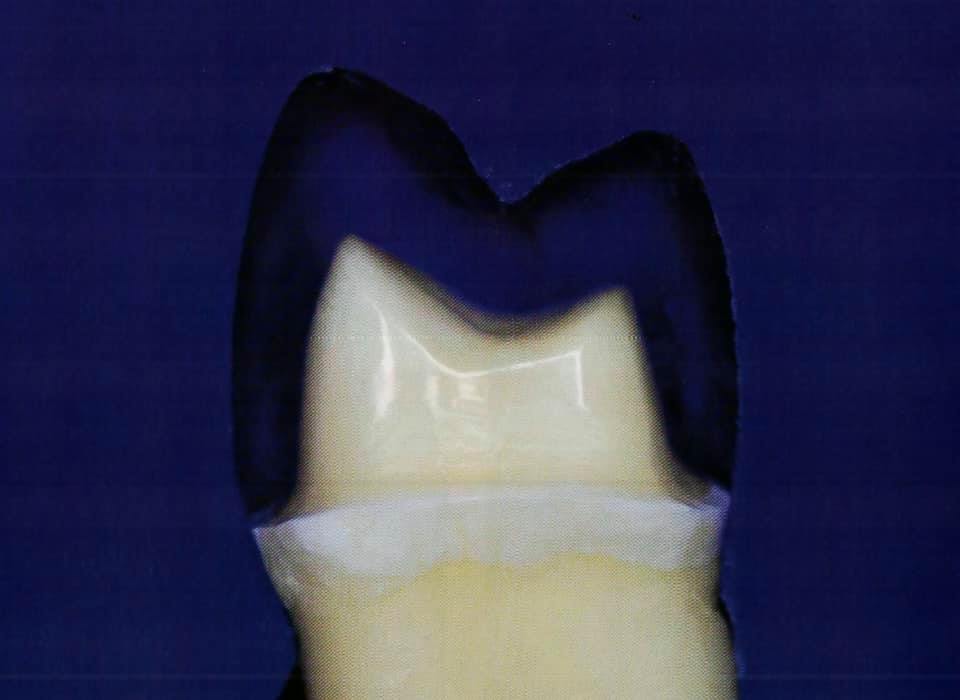
Of course, the above scheme had the average thickness required for a crown. However, currently, there is a wide range of materials available to the professional - according to the ceramic system employed, the required thickness and consequently the necessary amount of reduction will suffer minor changes.
The crowns can be manufactured with a single ceramic - without the need of a coping - via injection methods ( e.g, Empress ) or milling ( e.g, CAD/CAM systems like CEREC ), or by the association of strengthened coping based on lithium disilicate, alumina or zirconium dioxide and veneering ceramics with improved aesthetic characteristics (e.g, e.max, procera, inceram and lava systems).

I’d like to talk about a preparation that follows three main stages applied to three main areas.
Three main stages to get the final preparation of the crown:
- Cutting
- Refinement
- Finishing & polishing.
Three main areas :
- Free surfaces “ buccal & lingual ”.
- Occlusal surface
- Proximal surfaces “ mesial & distal “.
So, let’s get started..
Cutting:
First of all, let’s divide the tooth into 3 main areas :
1️⃣ Free surfaces “ buccal & lingual “.
2️⃣ Occlusal surface.
3️⃣ Proximal surfaces “ mesial & distal “.
1️⃣ Free surfaces “ buccal & lingual “.
2️⃣ Occlusal surface.
3️⃣ Proximal surfaces “ mesial & distal “.
✅ Free surfaces :
using a spherical point angled at about 45 degrees to the outer surface, a cervical groove is prepared so that only half of the tip penetrates the tooth structure.
The groove follows the gingival contour and still remains far from the gingiva. The final placement of its end is always performed while finishing the preparation.

Using a rounded-end cylindrical point, prepare longitudinal grooves on both free surfaces “ buccal & lingual” following the inclination planes of the middle and occlusal thirds.
The point is used parallel to the long axis of the tooth and deepened throughout half of its thickness in the middle third, while on the occlusal third the entire thickness is used following the inclination of the cusps.
The point is used parallel to the long axis of the tooth and deepened throughout half of its thickness in the middle third, while on the occlusal third the entire thickness is used following the inclination of the cusps.
✅ Occlusal surface:
with the same diamond point “ cylindrical “, depth to its full thickness, the grooves are extended to the occlusal surface always follow the cusps slopes.
with the same diamond point “ cylindrical “, depth to its full thickness, the grooves are extended to the occlusal surface always follow the cusps slopes.

✅ Proximal surfaces:
the adjacent teeth are protected with a metal matrix and a slice is made in the proximal area using a thin tapered point in order to separate the prepared tooth from the adjacent teeth.
the adjacent teeth are protected with a metal matrix and a slice is made in the proximal area using a thin tapered point in order to separate the prepared tooth from the adjacent teeth.

After obtaining a preliminary interproximal separation, the cylindrical point is returned to complete the anatomical reduction of the mesial half of the crown taking into consideration the depth of the grooves created.
Then the tip is moved from the buccal to the lingual direction, in order to define :
1. the most suitable termination such as deep chamfer
2. the correct taper, characterized at this time, by the parallelism of the mesial wall to the long axis of the crown
3. rounded internal angles
4. enough space for the ceramic.
1. the most suitable termination such as deep chamfer
2. the correct taper, characterized at this time, by the parallelism of the mesial wall to the long axis of the crown
3. rounded internal angles
4. enough space for the ceramic.
Continue on the occlusal surface following the guidelines imposed by the cusp anatomy and the depth cuts created before. Finally, all the grooves are joined, resulting in consistent and uniform reduction along the entire mesial half of the crown.
⛔️ Remember ❗️At this moment, the reduction is kept a few tenths of millimeters shorter than the desired final depth of the preparation regarding the refinement of the preparation in which the final definition of the amount of tooth structure occurs.
Repeat the step in the distal half of the tooth. Now, it is time to refine and adjust the termination and angulation of the different walls.
Repeat the step in the distal half of the tooth. Now, it is time to refine and adjust the termination and angulation of the different walls.

Refinement: remember the 3 main areas
1️⃣ Starting with the free surfaces, a bulky tapered with rounded end diamond point is used giving minimal angulation to the walls and modifying the position of the cervical margin approximating the gingival tissue.
⛔️ For the free surfaces, the point diameter should be approximately twice the reduction desired, to allow for the preparation to be performed with only half of the active tip.
2️⃣ For the proximal surfaces, a point of a lesser diameter- tapered with rounded end- is used in angulation similar to the long axis of the tooth, resulting in surrounding walls virtually parallel.
3️⃣ In the occlusal surface, the points are used in smoothing and rounding the angles of transition from one face to another.
Finishing & polishing:
Points similar to those mentioned above already employed except with fine and extra-fine grits.

⛔️ One of the most important tasks is the manual instrumentation of the cervical margins. Often even after finishing and polishing, the region has small irregularities and sharp angles, related to the angle of enamel rods and the form of diamond points used for preparation. To eliminate these irregularities, the best alternative is using a manual cutting instrument.

Then the preparation receives the final polishing with customized abrasive rubber points, which produce acceptable surface smoothness and facilitate obtaining accurate impression as well as reliable temporary restorations.
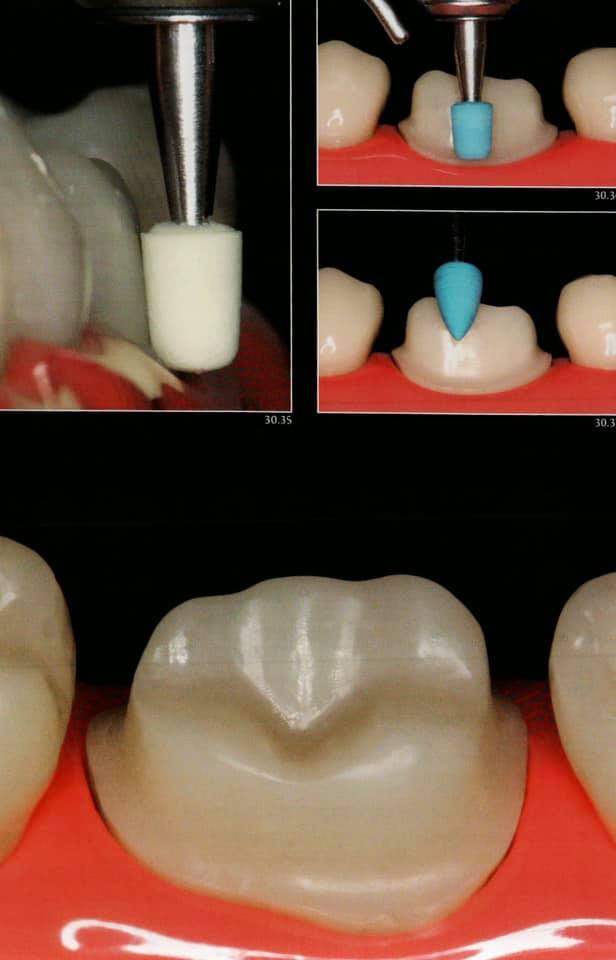
Now, the completed preparation meets all the requirements already discussed. It has sharp edges and the sufficient depth for ceramics presents the proper taper and perfectly smooth walls and the space available is compatible with the requirements of current ceramic systems.


⛔️ Remember that space should be evaluated both in static and in a dynamic way during occlusion- in maximum intercuspal position and during protrusion and lateral movements.
Islam Zakzouk
DSefa is a blog that's dedicated to bringing you high quality health, lifestyle tutorial and resources on different categories. It's main forus on user experience.


عظمه❤️
ReplyDeleteExcellent presentation ❤️
ReplyDeleteThank you
ReplyDeleteWow! Such an amazing and helpful post this is. I really really love it. It's so good and so awesome. I am just amazed. I hope that you continue to do your work like this in the future also Sleep dentistry
ReplyDelete👌
ReplyDeletePerfect
ReplyDeleteشكرا
ReplyDeleteThank you doc
ReplyDeletePerfect demonestration 🔥
ReplyDeleteThank you 🙏
ReplyDelete❤️❤️❤️❤️❤️
ReplyDeletevery useful ... thank you
ReplyDeleteThank you very much 🌹♥️
ReplyDeleteماشاء الله ,عظيم د اسلام
ReplyDeletePerfect
ReplyDeleteNaturally, the system shown above has the average thickness needed for a crown.
ReplyDelete