Anterior Crown Preparation
On Preparation
When we are going to start a tooth preparation, we have to pay attention to two main factors:
The principal objective in the anterior crown preparation is to provide adequate space to reproduce the emergence profile, occlusal anatomy, proximal contours, and contact. Because different biomaterials require variations in thickness for strength, the preparation dimensions for full-coverage restorations can vary.
The geometric form of the preparation varies according to the anatomical morphology of the tooth. The anterior teeth have an oval form. Low tapering of the walls provides such geometry in a simple way. This geometric shape provides inherent resistance to forces of mastication. Therefore, when sufficient tooth structure is missing like in cases of massive destruction or a badly decayed tooth, the biomechanics of the preparation can be optimized by restoring these contours with a core build-up prior to completion of the preparation.
- Amount of clearance/the space for the restorative material for strength
- The geometry of preparation that gives the restoration retention and stability.
In order to achieve success, it is essential that the preparation presents some features and meets certain requirements. The general shape of the preparation should follow the anatomical contours of the natural tooth with smooth and rounded transitional line angles.
All-ceramic crowns can be fabricated from one ceramic (eg, pressed or machined by CAD/CAM), or a combination of a ceramic coping and a reinforced veneering ceramic, with improved aesthetic features. These copings may be fabricated with different materials - lithium disilicate, alumina, zirconium dioxide - and for different systems, such as e.max (Ivoclar Vivadent), Procera (Nobel Biocare), lnCeram (VITA), and Lava (3M ESPE). Some of these systems allow for obtaining high strength ceramic infrastructures, even in small thicknesses (0.3 mm) facilitating the obtaining of less invasive preparations, without aesthetic impairment.
Clearly, the degree of translucency/opacity of the coping - a critical aspect in defining the aesthetic potential of each restorative system- varies significantly from one material to another. It should be stressed that the thickness of the coping, as well as its degree of translucency/ opacity, must be defined according to the color of the substrate to ensure perfect masking of its shade.
The darker the underlying tooth structure, the less translucent and/or thicker the coping should be.
General guidelines :
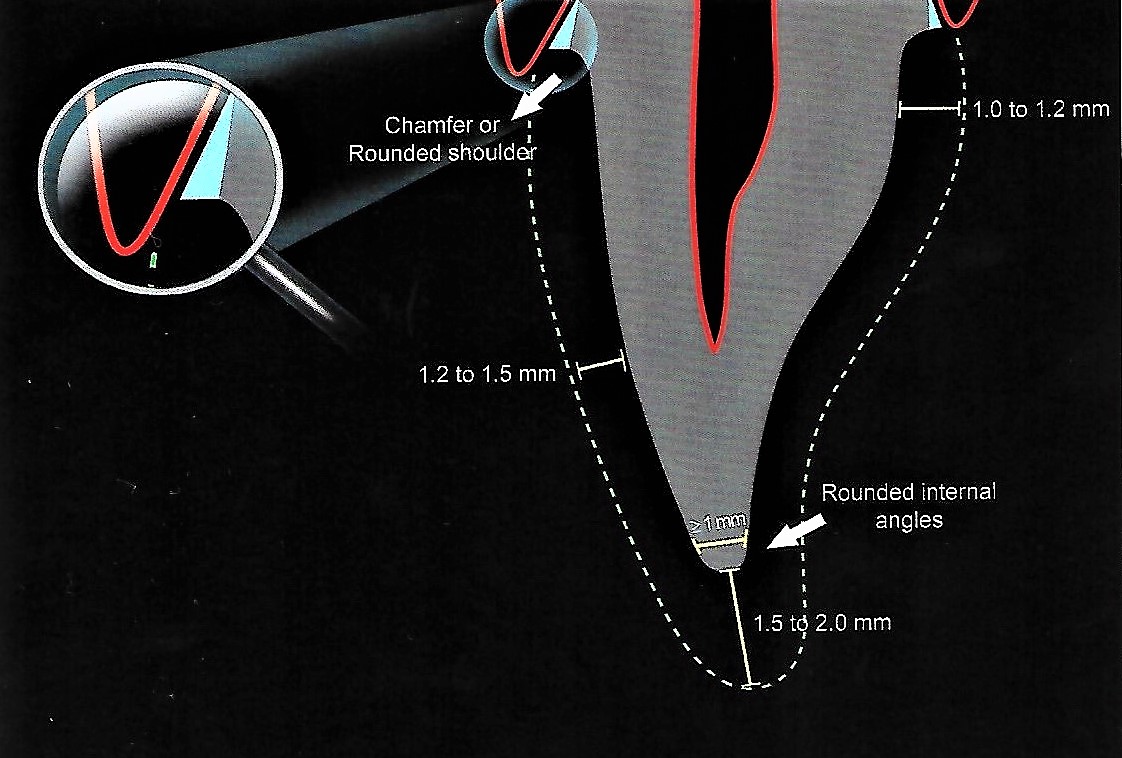
- Incisal reduction of about 1.5 to 2 mm in order to create enough space for the reproduction of the translucency and the opalescence effects which characterize the incisal third.
- The finish line should be sharp and defined, in addition to providing the coping and ceramic veneering the sufficient thickness.
- The axial preparation thickness varies between 1.2 mm cervically and 1.5 mm (middle and incisal).
- Deep chamfer finish line (or a rounded shoulder), flat and smooth with a 90-degree cavo-surface angle with the external surface.
As I'm going to feature the preparation of all-ceramic crowns. Thus, it is necessary that the available space, defined through the reduction with diamond points, is compatible with the restorative system to be used. Because of their shape, when used parallel to the axis of the preparation, these points confer ideal tapering to the preparation walls.

I’d like to talk about a preparation that follows three main stages applied to three main areas.
Three main stages to get the final preparation of the crown:
- Cutting
- Refinement
- Finishing & polishing
Three main areas :
- Incisal edge
- Free surfaces "labial & lingual"
- Proximal surfaces "mesial & distal"
So, let’s get started..
Cutting:
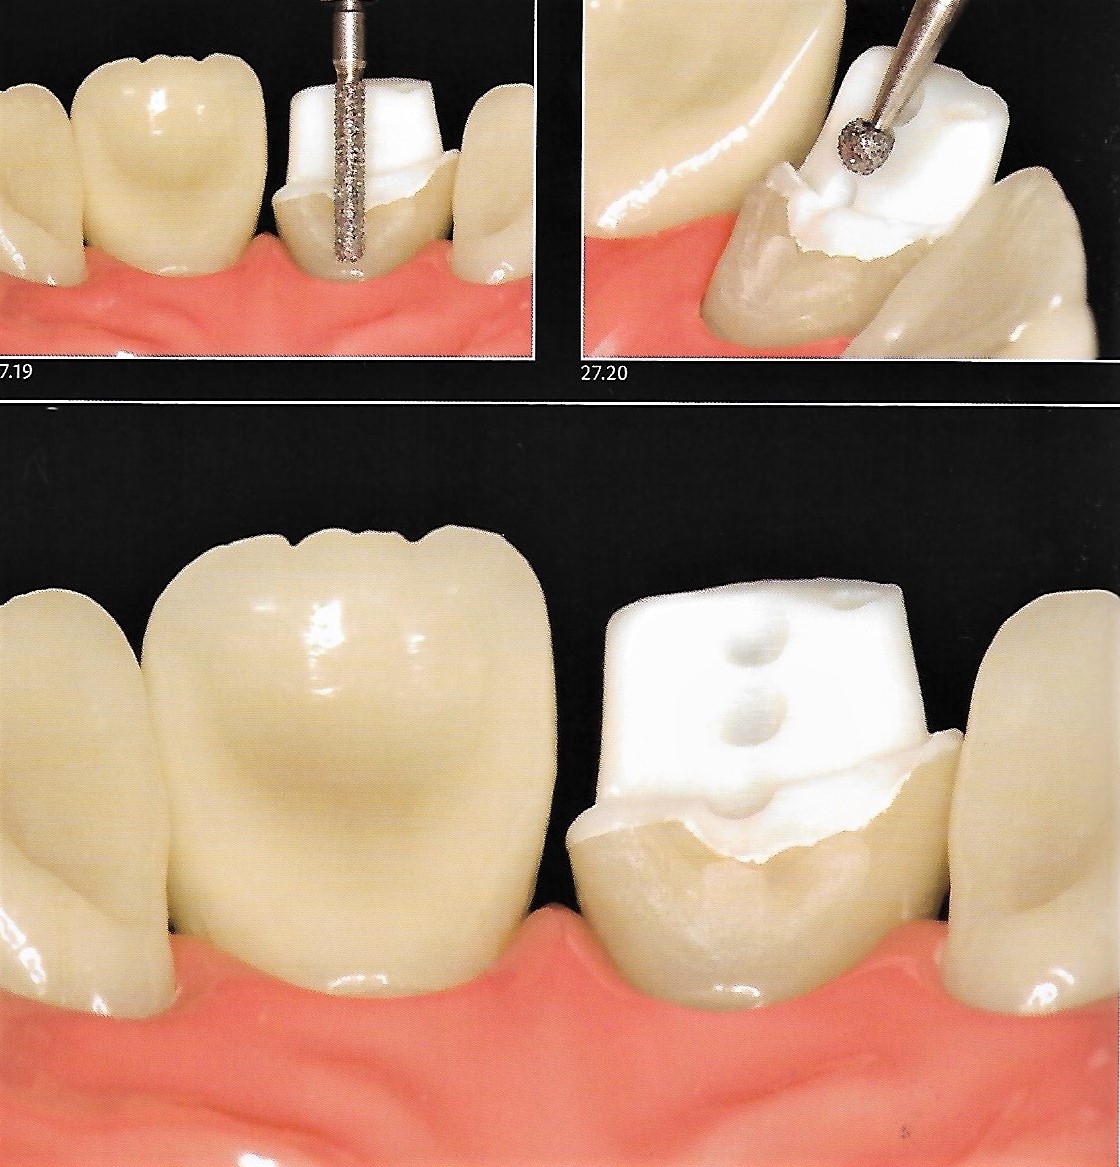
First of all, let’s divide the tooth into 3 main areas :
- Incisal edge
- Free surfaces "labial & lingual"
- Proximal surfaces "mesial & distal"
Incisal edge :
At first, we start to define depth cuts in the incisal region with a cylinder-shaped diamond point to its full thickness at an angle approximately parallel to the incisal edge and slightly tilted to the palatal surface. This step is designed to ensure sufficient thickness so that the restoration presents strength, enabling the ceramist to reproduce the optical features of the incisal edge. Depending on the ceramic system, the incisal reduction is about 1.5 to 2 mm.


Free surfaces :
using a spherical point angled at about 45 degrees to the labial and lingual surface, a cervical groove is prepared so that only half of the tip penetrates the tooth structure. The groove follows the gingival contour and still remains far from the gingiva. The final placement of its end is always performed while finishing the preparation.


Then, the preparation is performed on half of the surface by joining the longitudinal grooves until the required depth of these grooves is reached. Let's say, we will start with the mesial half, thus it is possible to clearly assess the amount of structure removed by the initial preparation before extending on the distal half of the surface. Using a silicone guide sectioned transversely is of great importance in such evaluation.
👉 The point is deepened throughout half of its thickness following the inclinations of the surfaces.


However, due to the concave shape of the lingual surface, it is easier to define the depth of reduction by making spot marks with a spherical diamond point deepened until its half diameter, then an ovoid or a flame-shaped diamond point is used to join them to accomplish uniform reduction initially.


👉 Remember the reduction will be increased throughout the preparation to achieve the desired depth.
Proximal surfaces :
The adjacent teeth are protected from accidental reduction with a metal matrix and a slice is made in the proximal area using a thin tapered point in order to separate the prepared tooth from the adjacent teeth.

After obtaining a preliminary interproximal separation, the cylindrical point is returned to complete the anatomical reduction of the mesial half of the crown taking into consideration the depth previously defined by the depth cuts to standardize the tissue reduction. The adjacent tooth is protected again with a strip of a metal matrix, and the reduction is implemented on the distal aspect the same way.
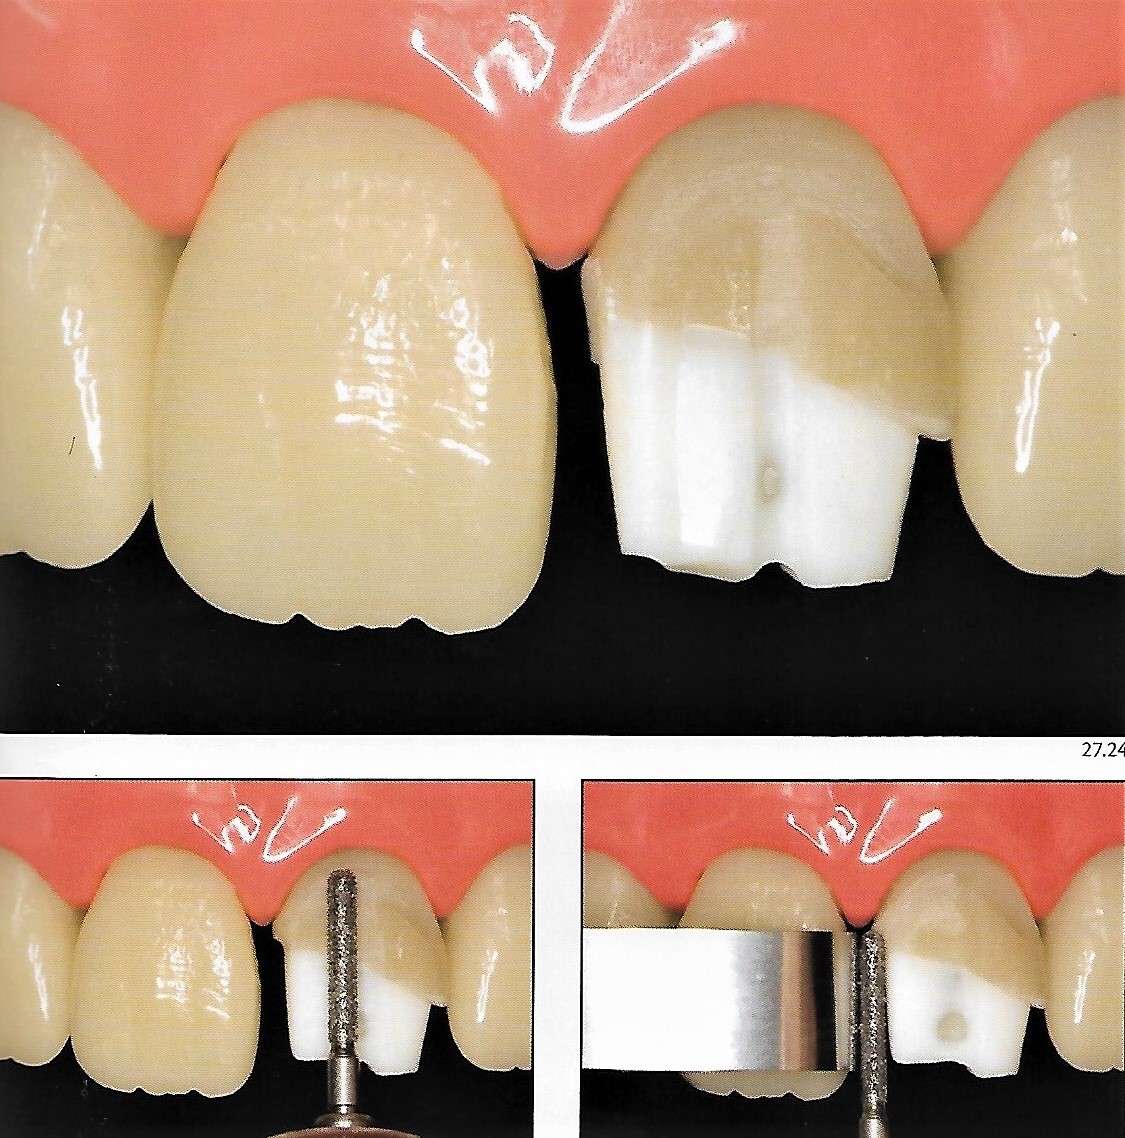
Then, the tip is moved from the buccal to the lingual direction, in order to define :
- The most suitable termination such as deep chamfer
- The correct taper - characterized at this time - by the parallelism of the mesial wall to the long axis of the crown
- Rounded internal angles
- Enough space for the ceramic.
Cervical termination
The best option is a deep chamfer margin or a rounded shoulder with uniform thickness and rounded internal angles. It is also important that the termination provides sufficient thickness that favors the stratification of ceramics. The edges must be sharp and well defined in all indirect restorations. When these conditions are not met, the impression does not clearly define the preparation margins and therefore there is a risk that the restoration remains poorly adapted or presents subcontouring or overcontouring.
The deep chamfer is a design in which the gingival floor intersects the axial wall at an obtuse sloping angle. This margin can provide an optimal bulk of ceramic material providing strength and an optimal esthetic result.
👉 The slight chamfer margin is a design that is a conservative modification of the deep chamfer in which the gingival margin is concave with a greater angulation than a knife-edge margin. This type is ideal for ceramic restorations on mandibular anterior incisors.
👉 Of course, whatever the position of the finish line, the preparation should be as atraumatic as possible ( eg, it is useless to have an equigingival termination if excess cement is left after cementation, which could compromise the periodontal health ).
For non-discolored teeth, the finish line can be kept supragingival, but, it should be placed slightly intrasulcular to hide the transition between the crown and the abutment tooth especially in cases of darker abutments.👉 Importantly, during all stages of the preparation already performed, the depth of the reduction still should not reach the planned final depth.
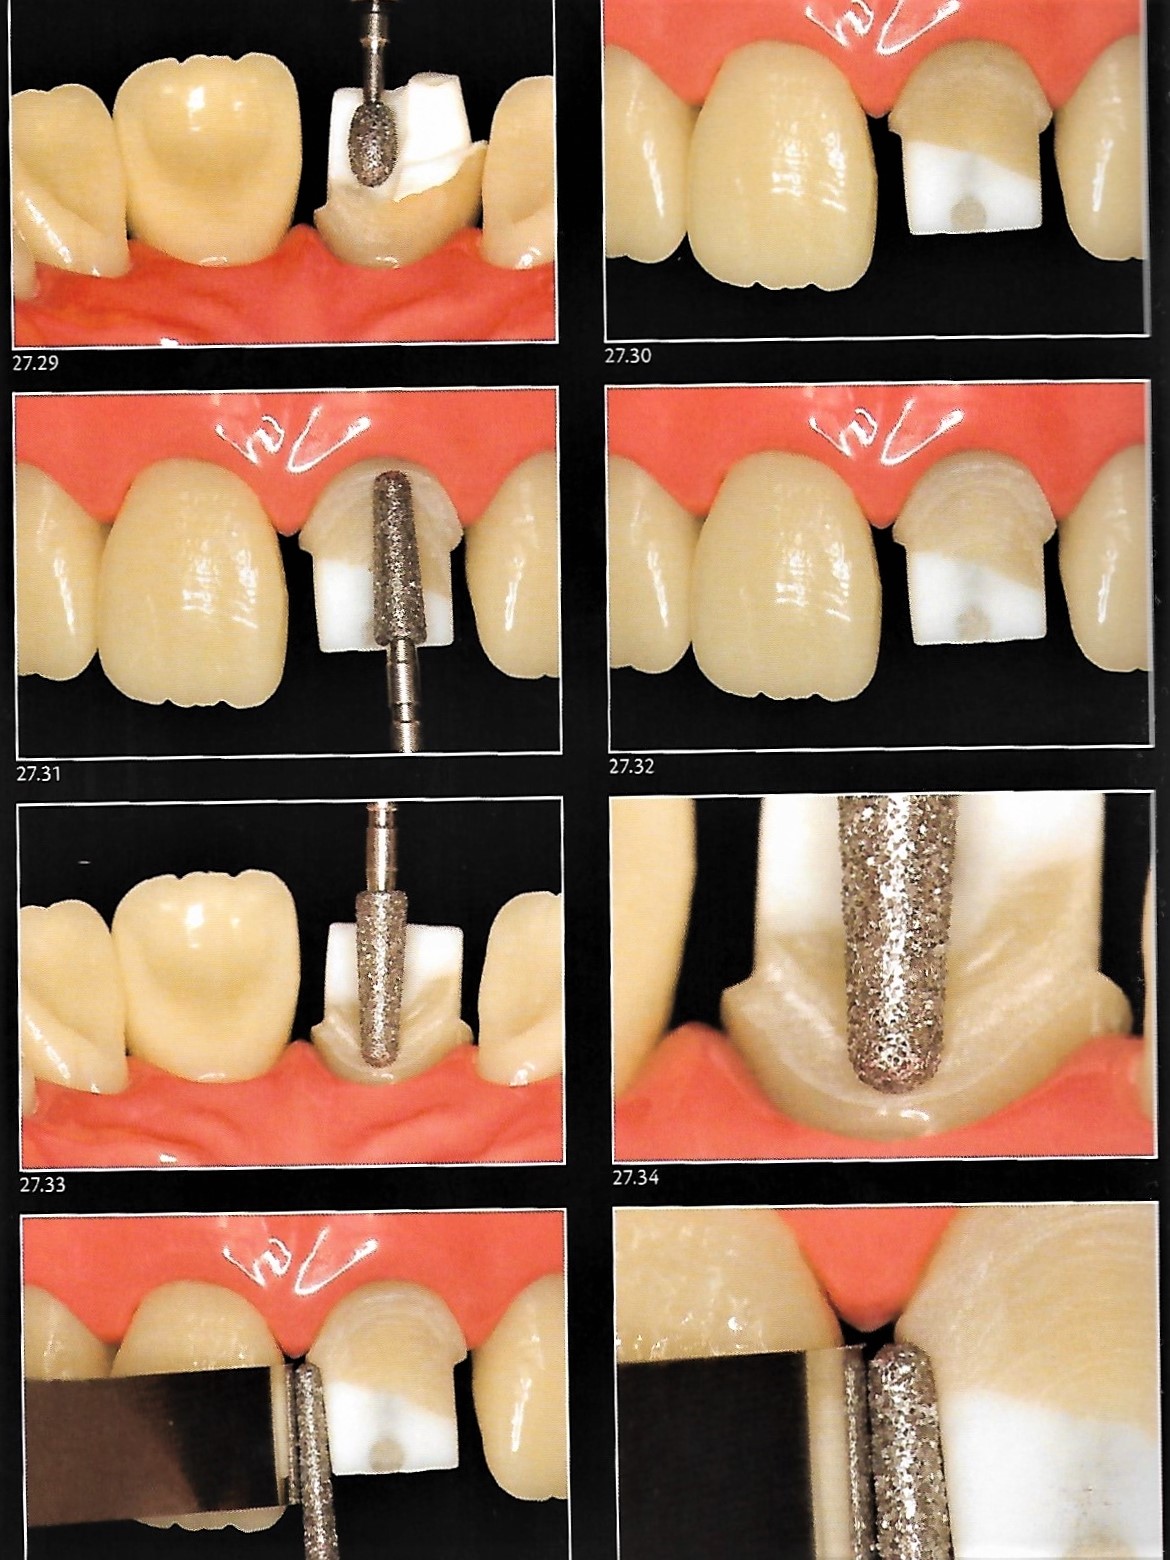
Refinement:
It is important that the internal angles of the preparation be rounded to avoid areas of stress concentration in the future restoration. The preparation must also present regular walls and a smooth surface to facilitate the impression and to improve the crown adaptation. To obtain all these features, it is essential to have the appropriate diamond points - they define the depth, the type of cervical termination, and the final paper of the preparation.

Diamond points with the same shape as those used previously are used now with a fine grain giving minimal angulation to the walls and modifying the position of the cervical margin approximating the gingival tissue.

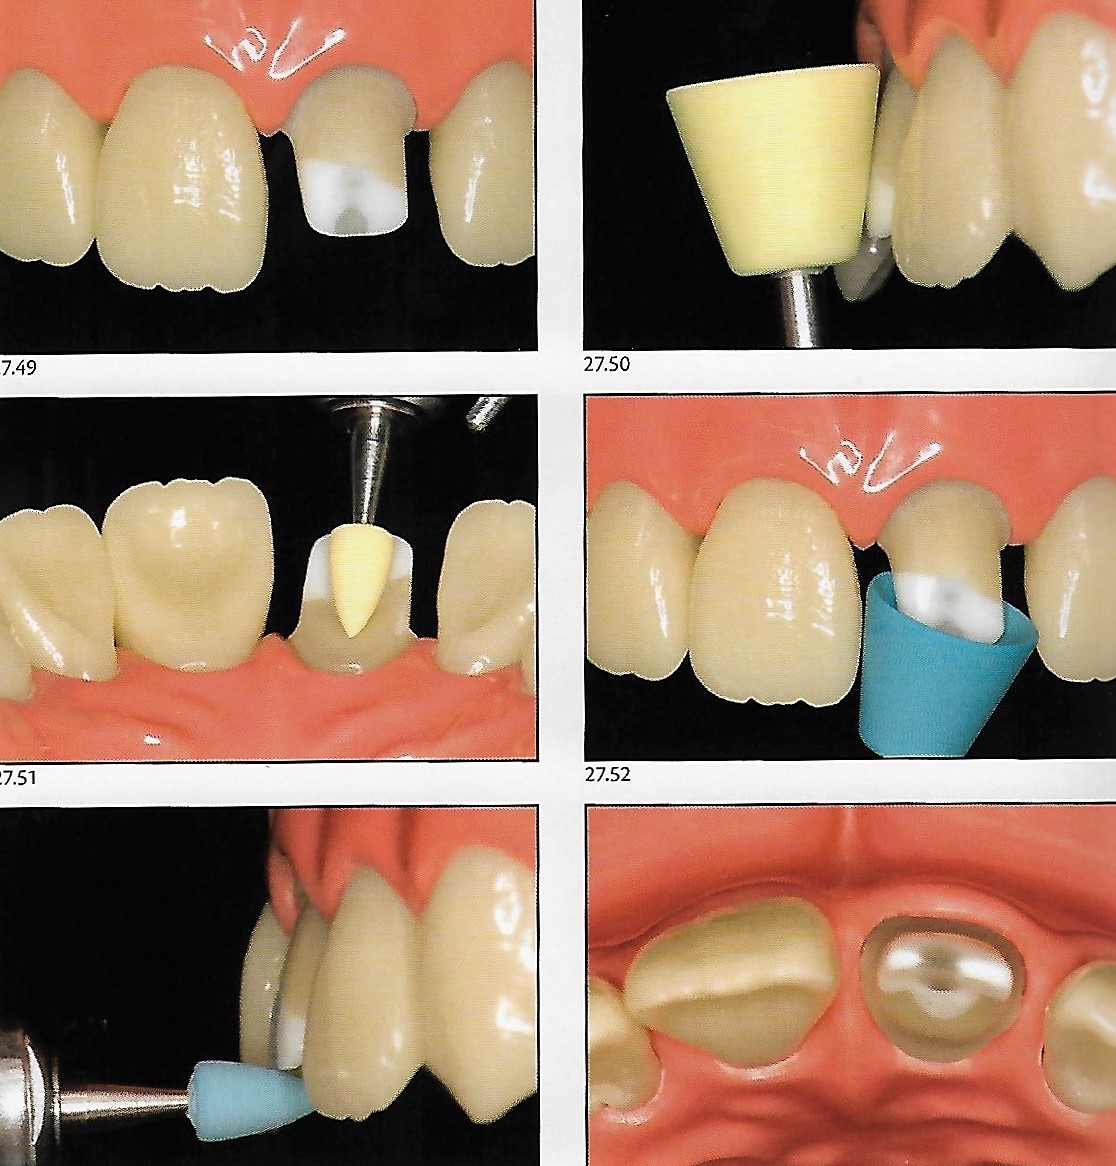
Finishing & polishing:
The finishing phase of the preparation is started. The preparation is completed with extra-fine diamond points. Then it is time to make the intrasulcular extension of the termination on the buccal and proximal margins. This maneuver can be performed by the same points previously used, or with special tips that have abrasive particles only at the end. Used in conjunction with gingival retractors or retraction cords, these points are excellent for the cervical margin to be placed at or slightly subgingival.


In the palatal surface, an ovoid fine-grained diamond point, highlights the reduction already accomplished in the area of concavity, promoting a more uniform surface free of sharp internal angles.

At this point, it is of interest to carry out the polishing of the preparation, a simple measure but it has several advantages:
- improves the reproduction of the preparation in the model
- favors obtaining perfectly fitted crowns
- making easier and faster the procedures of fabrication, cementation, and withdrawal and recementation of the temporary.
Polishing may be performed with abrasive rubber points available in different shapes and degrees of abrasiveness. The more abrasive rubbers carry out the pre-polishing, while the less abrasive rubbers provide smoothness for the final preparation.

At this moment, the geometric shaping of the preparation is already compatible with the fabrication of ceramic restorations; the walls have a low taper, providing retention and stability to the crown, the cervical termination is sharp and well-defined, and the depth is sufficient to stratify the ceramic.
At this moment, the geometric shaping of the preparation is already compatible with the fabrication of ceramic restorations; the walls have a low taper, providing retention and stability to the crown, the cervical termination is sharp and well-defined, and the depth is sufficient to stratify the ceramic.

In the presented case, a fractured central incisor with endodontic treatment and a slight discoloration of the remnant is shown. Due to extensive tissue loss, a composite resin core build-up has been performed then preparation for an all-ceramic crown has been implemented as described in the following video 👇
Ref.
- Routes for excellence in restorative dentistry, mastery for beginners and experts.
- Esthetic and restorative dentistry 3rd edition, Douglas A Terry & Willi Geller
Islam Zakzouk
DSefa is a blog that's dedicated to bringing you high quality health, lifestyle tutorial and resources on different categories. It's main forus on user experience.


شكرا
ReplyDeleteتسلم إيدك يا باشا
ReplyDeleteتحفه جدااا ربنا يجازيك خير 🌸🌸🌸
ReplyDeleteIt's amazing
ReplyDeleteIt's amazing
ReplyDeleteAhmedebrahim41790@gmail.com
ReplyDeletemohamedyasir138@gmail.com
ReplyDeleteHaider199551923@gmail.com
ReplyDeleteHichemsherouana@gmail.com
ReplyDeletemohamedmamdoh8@gmail.com
ReplyDeleteemhmd154@gmail.com
ReplyDeleteSaberashour93@gmail.com
ReplyDeleteBassamwaleed611@yahoo.com
ReplyDeleteAhmadovich50@gmail.com
ReplyDeleteZiadabdo304@gmail.com
ReplyDeletedr3aleem@gmail.com
ReplyDeletemohamedfaisal1997@gmail.com
ReplyDeleteFatmasharnoby7@gmail.com
ReplyDeleteamrfaidamr@gmail.com
ReplyDeletefarahatk03@gmail.com
ReplyDeleteFatmasharnoby7@gmail.com
ReplyDeleteFatmasharnoby7@gmail.com
ReplyDeleteNabilbo32@gmail.com
ReplyDeleteDr.walid.atia@gmail.com and thank you so much for all what you do doctor 👏❤
ReplyDeleteLiliradi782008@yahoo.com
ReplyDeleteLiliradi782008@yahoo.com
ReplyDeleteNasefha@gupco.net
ReplyDeleteKaponii1@gmail.com
ahmed.abdelhady@msa.edu.eg
ReplyDeleteahmed.abdelhady@msa.edu.eg
ReplyDeleteahmed.morgan@dentistry.cu.edu.eg
ReplyDeleteyoussef.morsy2014@gmail.com
ReplyDelete3bdalra7man.elsayed@gmail.com
ReplyDeleteGrade 2019
dentistfady@gmail.com
ReplyDeletemono.sasa100@gmail.com
ReplyDeletedromnia96@gmail.com
ReplyDeletehozifaasker7@gmail.com
ReplyDeletetheshado1000@gmail.com
ReplyDeleteabdomohiy360@gmail.com
ReplyDeleteKekekoko442@gmail.com
ReplyDeletemahmoudmahmmed909@gmail.com
ReplyDeletedrraneem.abdo@gmail.com
ReplyDeleteyacineatailia58@gmail.com
ReplyDeleteHemaadel96@gmail.com
ReplyDeleteagaddd98@gmail.com
ReplyDeleteabdelrahman.mersa@gmail.com
ReplyDeleteahmeddoc21@gmail.com
ReplyDeleteElgneedya@gmail.com
ReplyDeletemoabas2121@gmail.com
ReplyDeletesarhanmaged9@gmail.com
ReplyDeleteNasefha@gupco.net
ReplyDeleteKaponii1@gmail.com
dr.asalah954@gmail.com
ReplyDeleteasmaamer267@gmail.com
ReplyDeleteAhmed.sobhy41@yahoo.com
ReplyDeleteabdonadi.an@gmail.com
ReplyDeleteahmedkhaled860@gmail.com
ReplyDeletenadienkadry2010@gmail.com
ReplyDeletepierreehab64@gmail.com
ReplyDeleteMohamadalhassan918@gmail.com
ReplyDeleteأسامة أحمد العوضي
ReplyDeleteOsamaroma96@gmail.com
M.h.abozaid@hotmail.com
ReplyDeleteEmaneltabakh2@gmail.com
ReplyDeleteabdallakishk@gmail.com
ReplyDeleteomarisse69@gmail.com
ReplyDeleteahmedmahfoz52@gmail.com
ReplyDeleteI am a fresh graduate
Nonawamoora2012@gmail.com
ReplyDeletealmoomohamed@yahoo.com
Deletemidoosalem95@gmail.com
ReplyDeletemidoosalem95@gmail.com
ReplyDeletemidoosalem95@gmail.com
ReplyDeleteEslamtawfiik99@gmail.com
ReplyDeleteKhedr.osama@yahoo.com
ReplyDeletedr.khaled.shennawy@gmail.com
ReplyDeletemhamedhamdy.mh@gmail.com
ReplyDeletesala797moh@gmail.com
ReplyDeletesala797moh@gmail.com
ReplyDeletedentmohammed01120212304@gmail.com
ReplyDeleteabd0ooadel99@gmail.com
ReplyDeleteae.loay88850@gmail.com
ReplyDeleteabdelmohsenammar@gmail.com
ReplyDeleteiurcutadela@yahoo.com
ReplyDeleteتسلم ايديك
ReplyDeleteameermikky@gmail.com
ReplyDeletemo.khalil23k@gmail.com
ReplyDeletenaimjamal@yahoo.de
ReplyDeleteEslambedier25@gmail.com
ReplyDeleteMohamed dorgham
ReplyDeleteAlaaemad621@gmail.com
ReplyDeleteAhlawyana992@gmail.com
ReplyDeleteYasmingamal579@gmail.com
ReplyDeletemostafahegazy246@gmail.com
ReplyDelete
ReplyDeleteYasmingamal579@gmail.com
omar.ashraf10@msa.edu.eg
ReplyDeletegonyhadress2@gmail.com
ReplyDeletemuhamedmostafa1@gmail.com
ReplyDeleteahmedmuzahim89@gmail.com
ReplyDeletemuhamedmostafa1@gmail.com
ReplyDeletesoma15530@gmail.com
ReplyDeleteak8814677@gmail.com
ReplyDeletedrolamma@gmail.com
ReplyDeletedentahmedkhallaf@gmail.com
ReplyDeleteazzammostafa16@gmail.com
ReplyDeletelelelmansi@gmail.com
ReplyDeletemuhamedhamed78@gmail.com
ReplyDeleteasmaamaboutaleb@gmail.com
ReplyDeleteAbdoeltohamy15@gmail.com
ReplyDeletema342685@gmail.com
ReplyDeleteAlifergani2017@gmail.com
ReplyDeletealaaamiin21@gmail.com
ReplyDeletemahmoudtarek1221@gmail.com
ReplyDeletesidharthmenon93@gmail.com
ReplyDeletehamza_godlion@yahoo.com
ReplyDeletemustafa.roshdy698@gmail.com
ReplyDeleteAyaelbab552@gmail.com
ReplyDeleteahmed0ibrahim1498@gmail.com
ReplyDeleteAmeraamory@gmail.com
ReplyDeleteesraa.elgendy100@gmail.com
ReplyDeletefouadhawash868@gmail.com
ReplyDeletefmdaif@hotmail.com
ReplyDeletedweadar0@gmail.com
ReplyDeleteabdoelbna74@gmail.com
ReplyDeleteShimaasalah1997@Gmail.com
ReplyDeleteA7meddweedar@gmail.com
ReplyDeleteMernamohameddent@gmail.com
ReplyDeleteoabdelaziz026@gmail.com
ReplyDeleteziyadessamshoman@gmail.com
ReplyDeleteMohamedkhaled180698@gmail.com
ReplyDeletemessaedabdaly456@gmail.com
ReplyDeletemedokhelo96@gmail.com
ReplyDeletemahmoudfawzy8397@gmail.com
ReplyDeletehazemkhaledsaber@hotmail.com
ReplyDeletemister2864@gmail.com
ReplyDeletedr.haitham21@yahoo.com
ReplyDeleteAaddeellssoobbhhyy@gmail.com
ReplyDeleteAaddeellssoobbhhyy@gmail.com
ReplyDeletemohamedkatamish@yahoo.com
ReplyDeleteMostafakishk75@gmail.com
ReplyDeleteRowannagiib@gmail.com
ReplyDeleteKmido114@gmail.com
ReplyDeletemsleem250@gmail.com
ReplyDeleteHalamurad00@gmail.com
ReplyDeletedrahmedaref15@gmail.com
ReplyDeleteBaheera.elhapal@gmail.com
ReplyDeletedoaa_sayed1@yahoo.com
ReplyDeleteMany thanks
elsayedamr584@gmail.com
ReplyDeleteraniaosama67@gmail.com
ReplyDeleteraniaosama67@gmail.com
ReplyDeletemedosaad012011010@gmail.com
ReplyDeleteBasel20222@gmail.com
ReplyDeleteAmri9166@gmail.com
ReplyDeletedr.mahmoud7995@gmail.com
ReplyDeleteAlielkady946@gmail.com
ReplyDeletemariamsamir081@gmail.com
ReplyDeletealagamy11@gmail.com
ReplyDeleteAhmed.elshafey@dentistry.cu.edu.eg
ReplyDeletetahaabdalhak97@gmail.com
ReplyDeleteshakerahmed290@gmail.com
ReplyDeleteNooranayman5@gmail.com
ReplyDeleteeh010190@gmail.com
ReplyDeleteeh010190@gmail.com
ReplyDeletemhmdbdalsmyd@gmail.com
ReplyDeletesultansomaya@gmail.com
ReplyDeletesultansomaya@gmail.com
ReplyDeleteTahaemam.abo@gmail.com
ReplyDeletenaderg544@gmail.com
ReplyDeleteMenna.mohamed406@gmail.com
ReplyDeleteHeshamelseoudi@azhar.edu.eg
ReplyDeleteabdelrahman-mohammed@hotmail.com
ReplyDelete.
ReplyDeletemahmoud3122018@gmail.com
ReplyDeletem_nagi@live.com
ReplyDeletemidokhaled.14749@gmail.com
ReplyDeletefekry334@gmail.com
ReplyDeleteabdelrahmanabozekry97@gmail.com
ReplyDeleteMostafa13797@gmail.com
ReplyDeleteOmar.mohamed3897@gmail.com
ReplyDeletealaameldeep@gamil.com
ReplyDeleteNice job
ReplyDeleteosamakhirr22@gmail.com
ReplyDeleteGreat effort.. thanks for sharing dr
ReplyDeletealshhawy307@gmail.com
ReplyDeleteamr2napil2020@gmail.com
ReplyDeletezeyadelgabroney@gmail.com
ReplyDeletedr.omar.adel.77@gmail.com
ReplyDeletehassanessameldin70@gmail.com
ReplyDeleteshaheenmido5@gmail.com
ReplyDeleteislam.alsakkaf@gmail.com
ReplyDeleteThank you so much sir, yusurfalah9@gmail.com
ReplyDeletem.emad1035@gmail.com
ReplyDeletethanks
hegaz00y@gmail.com
ReplyDeleteraniamohamed905@gmail.com
ReplyDeleteanas.bahaa1092@gmail.com
ReplyDeleteتسلم ي كبير
ReplyDeleteZordok9955@gmail.com
ReplyDeleteDiaakhoder60@gmail.com
ReplyDeletehodalking429@gmail.com
ReplyDeletehodalking429@gmail.com
ReplyDeleteSaraelbttat@gmail.com
ReplyDeletealaa_shiqaqi@hotmail.com
ReplyDeleteislam.alhanafy@dentistry.cu.edu.eg
ReplyDeleteabdallahemad271@gmail.com
ReplyDelete